It's been another month since my last update, although I have been getting a lot done in the past week. The staff is finally finished! I may go back and add a leaf to hang with the straps, if I end up having time for that.
The straps are made of cotton strips that I sewed together to make tubes, which were ironed flat along the seams. They are attached by hand, and sewn to the unpainted green band.
The design is painted on with acrylic paint. I do not recommend painting acrylic onto cotton, it takes several coats and can be difficult to keep fluid and consistent.
There are fabric paints available at most craft stores, don't be a baddie like me.
==================================================================
The next big item I have to build is the shoulder armor. I am using a similar process as the staff - build it up with a foam base and cover in paper-mache.
 Here you can see them with the first layer. I'll have to go back over once or twice more just so there's enough to sand without going through to the foam underneath.
The raised area in the middle of each piece will have a gem inserted, with an LED and battery pack so it glows.
My first attempt at casting gemstones was Friday night, and they didn't turn out too badly considering the fact that the mold is made out of paper and tape. I used theproplady's resin gemmaking tutorial over on youtube, which are quite helpful. She has several videos about casting your own gems, so check them out!
The tape I used must have not been the right kind of plastic, or I must not have added enough catalyst into my resin mixture, because the resulting gems were still tacky after several hours drying.
 I used 400 grit wet/dry sandpaper to sand the gems in the hopes the left over tackiness will disappear. I will probably still need to use a plastic polish to hide the sandpaper scuffs and make the gems shine.
The large gem in the middle is the only one that has been sanded so far, the other two feel like Jolly Ranchers. Ick!
I may also end up re-casting them if I can get a decent mold out of either alginate or plaster-of-paris.
Making your own mold out of paper and tape is incredibly tedious and difficult to do well if you have difficulty making patterns for geometric shapes.
==================================================================
I started working on the ears I'll need to go with my costume. I could have bought a pair of ears and saved myself some time and effort, but this is something I've always wanted to try. They'll fit better this way, too (in theory).
 I found the How to make Hobbit Ears tutorial and have followed their instructions up to the sculpt step.
I used alginate mold material and plaster-of-paris mix from my local Dick Blick. Both have worked well so far, although the dental-grade alginate has been damp to the touch, even after it has hardened, like it sweats. I have no idea why the alginate does this.
Regardless, I was able to get nice plaster casts from the molds I made.
I cut two lengths of wire, one for each ear, and rigged a wire support/armature to build the modeling clay around. I will likely add a wire into each finished prosthetic ear, to keep them from sagging.
There is still a bit of work to do on sculpting the ears to my satisfaction and making them as symmetrical as possible, but they are fairly evenly proportioned and decent enough for about 5 hours of work.
There has been much painting over the last week, but the process has been slow-going due to high humidity (sidenote: there needs to be an acrylic paint that dries the same no matter the humidity *shakes fist* as I am tired of waiting 15-30 minutes between coats).
 I finished putting on the gesso primer and painting the base green for the staff ends, as well as adding most of the details. Looking back, the most challenging part of this was the gradient green-to-light-green on the crest. That was a royal pain, as I have not worked with acrylics seriously for about 6 years. Here are the results!
The left image is a rough lay-in of where the gradient should be, and I worked with it for what seemed like hours until it was to my satisfaction.
The image on the right shows the top and bottom sections, the top with runes painted on (I may end up going back in to give them more depth; a carved-in appearance, but only if I end up with extra time) and the bottom before runes.
The bottom was much less of a headache because it did not require any difficult painting technique, just one solid color for each design.
 Here it is in all its wonderfully difficult to photograph glory!
I still need to decide whether I want to paint the last green band on the staff's head and attach a feather separately, or attach a fabric band so I can include the feather that way. I also still need to sew the two fabric loops to attach on the head of the staff as well - but that requires fabric hunting - and that will need to wait for a few more weeks until I no longer require a boot on my nearly-healed foot.
Fortunately, the bulk of this prop is complete. I just need to finish up those tidbits and give it a nice matte clear coat and I can mark the Wildfury Greatstaff off the to-do list! I will be glad to have it finished so I can focus on the massive amount of work I have yet to complete before this costume is ready to be worn.
====================================================================
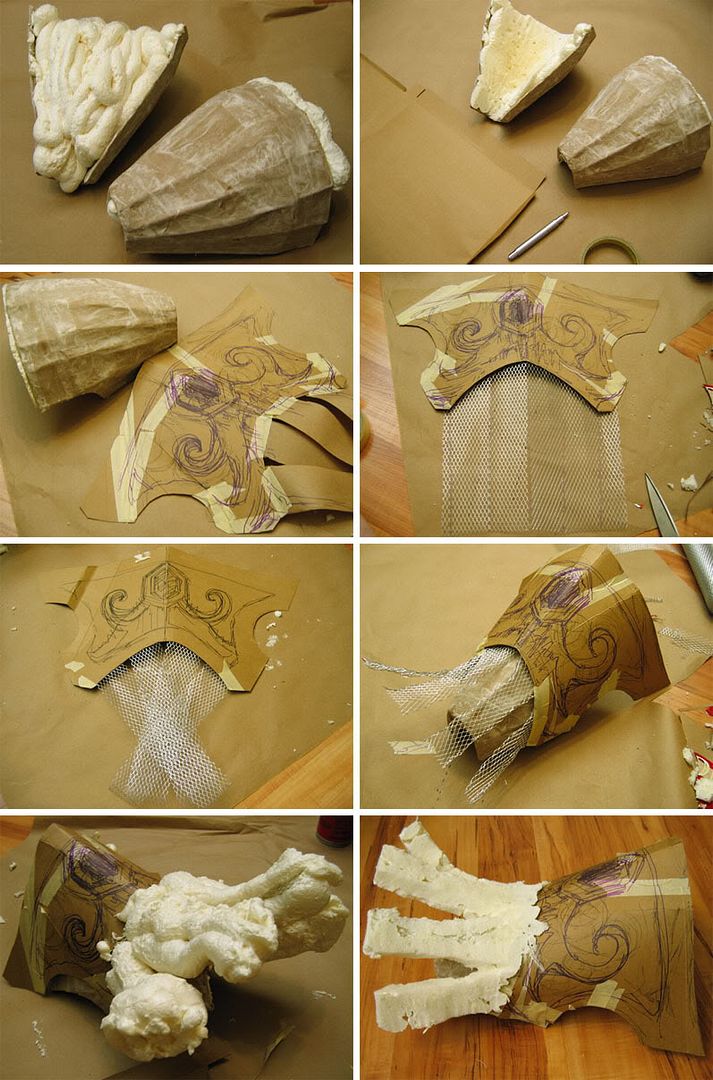
The next item up for construction is the Nordrassil Mantle, or the costume's shoulder armor. These will probably be the most time-consuming items I have to construct due to the nature of armor found in World of Warcraft (the bigger the shoulders, the more important the character - ha).
 I started with a cardboard base, cut and taped until I got a shape that fit the item's base model, and covered it in a few layers of paper mache. I then filled it with expanding insulation foam (so it would not just be hard cardboard against my shoulders. I may also add additional soft foam later if they end up being too hard still, or uncomfortable). Once the foam had dried, I cut away most of the underside.
The most time consuming part of this, so far, was making the pattern for the top. Patterns might take a while to get right, but they go a long way toward making your costume awesome. A bad pattern will ruin a costume, promise.
Once all the patterning was done and to my liking, I got out the wire mesh. This item is very easy to find in art stores and craft stores, I got mine at Dick Blick. You -can- use the stuff found at stores like Home Depot, but the craft variety is just as expensive, and a heck of a lot easier to work with. I used my crappy scissors to cut the mesh; Please do not use fabric scissors or nice scissors with this stuff - it will make nicks in the blades and turn them into garbage scissors. I bent the sides over to give it shape (and so my fingers would get stabbed less).
Cue the expandy-foam, yet again, and you end up with something Cthulhu would likely be proud of (yeah, it's that scary).
After it was completely dried I got out my knife and carved the foam to look like my reference image. The best part about using wire mesh with the expanding foam is that if you get to it before the foam is rock-hard you can still bend it! And so I did, since the prongs weren't looking exactly the way I wanted.
I'd like to thank masking tape, who has been awesome today, for keeping things where they need to stay and even playing nice with foam. You are the best friend a girl can have.. well, almost.
 It's been another month since my last update, although I have been getting a lot done in the past week. The staff is finally finished! I may go back and add a leaf to hang with the straps, if I end up having time for that.
  Here you can see them with the first layer. I'll have to go back over once or twice more just so there's enough to sand without going through to the foam underneath.
  I used 400 grit wet/dry sandpaper to sand the gems in the hopes the left over tackiness will disappear. I will probably still need to use a plastic polish to hide the sandpaper scuffs and make the gems shine.
 I found the How to make Hobbit Ears tutorial and have followed their instructions up to the sculpt step.