 I finished putting on the gesso primer and painting the base green for the staff ends, as well as adding most of the details. Looking back, the most challenging part of this was the gradient green-to-light-green on the crest. That was a royal pain, as I have not worked with acrylics seriously for about 6 years. Here are the results!
The left image is a rough lay-in of where the gradient should be, and I worked with it for what seemed like hours until it was to my satisfaction.
The image on the right shows the top and bottom sections, the top with runes painted on (I may end up going back in to give them more depth; a carved-in appearance, but only if I end up with extra time) and the bottom before runes.
The bottom was much less of a headache because it did not require any difficult painting technique, just one solid color for each design.
 Here it is in all its wonderfully difficult to photograph glory!
I still need to decide whether I want to paint the last green band on the staff's head and attach a feather separately, or attach a fabric band so I can include the feather that way. I also still need to sew the two fabric loops to attach on the head of the staff as well - but that requires fabric hunting - and that will need to wait for a few more weeks until I no longer require a boot on my nearly-healed foot.
Fortunately, the bulk of this prop is complete. I just need to finish up those tidbits and give it a nice matte clear coat and I can mark the Wildfury Greatstaff off the to-do list! I will be glad to have it finished so I can focus on the massive amount of work I have yet to complete before this costume is ready to be worn.
====================================================================

The next item up for construction is the Nordrassil Mantle, or the costume's shoulder armor. These will probably be the most time-consuming items I have to construct due to the nature of armor found in World of Warcraft (the bigger the shoulders, the more important the character - ha).
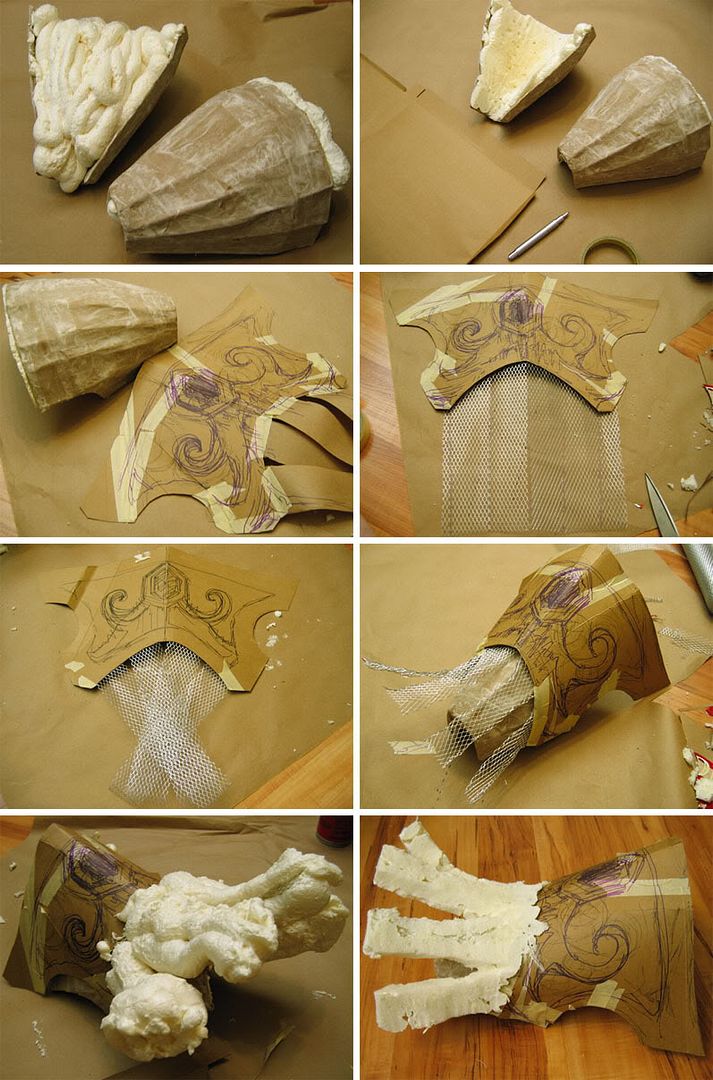 I started with a cardboard base, cut and taped until I got a shape that fit the item's base model, and covered it in a few layers of paper mache. I then filled it with expanding insulation foam (so it would not just be hard cardboard against my shoulders. I may also add additional soft foam later if they end up being too hard still, or uncomfortable). Once the foam had dried, I cut away most of the underside.
The most time consuming part of this, so far, was making the pattern for the top. Patterns might take a while to get right, but they go a long way toward making your costume awesome. A bad pattern will ruin a costume, promise.
Once all the patterning was done and to my liking, I got out the wire mesh. This item is very easy to find in art stores and craft stores, I got mine at Dick Blick. You -can- use the stuff found at stores like Home Depot, but the craft variety is just as expensive, and a heck of a lot easier to work with. I used my crappy scissors to cut the mesh; Please do not use fabric scissors or nice scissors with this stuff - it will make nicks in the blades and turn them into garbage scissors. I bent the sides over to give it shape (and so my fingers would get stabbed less).
Cue the expandy-foam, yet again, and you end up with something Cthulhu would likely be proud of (yeah, it's that scary).
After it was completely dried I got out my knife and carved the foam to look like my reference image. The best part about using wire mesh with the expanding foam is that if you get to it before the foam is rock-hard you can still bend it! And so I did, since the prongs weren't looking exactly the way I wanted.
I'd like to thank masking tape, who has been awesome today, for keeping things where they need to stay and even playing nice with foam. You are the best friend a girl can have.. well, almost.
I love the way your staff has turned out! I am getting ready to start working on mine for BlizzCon as well - it's awesome to see other people just as excited about their costuming. I may have some questions about how you used the insulation foam combined with your different staff segments once I get started, if that is alright. Again, great work and hopefully I'll get to see it all together in person as BlizzCon!
ReplyDelete