It's been another month since my last update, although I have been getting a lot done in the past week. The staff is finally finished! I may go back and add a leaf to hang with the straps, if I end up having time for that.
The straps are made of cotton strips that I sewed together to make tubes, which were ironed flat along the seams. They are attached by hand, and sewn to the unpainted green band.
The design is painted on with acrylic paint. I do not recommend painting acrylic onto cotton, it takes several coats and can be difficult to keep fluid and consistent.
There are fabric paints available at most craft stores, don't be a baddie like me.
==================================================================
The next big item I have to build is the shoulder armor. I am using a similar process as the staff - build it up with a foam base and cover in paper-mache.
 Here you can see them with the first layer. I'll have to go back over once or twice more just so there's enough to sand without going through to the foam underneath.
The raised area in the middle of each piece will have a gem inserted, with an LED and battery pack so it glows.
My first attempt at casting gemstones was Friday night, and they didn't turn out too badly considering the fact that the mold is made out of paper and tape. I used theproplady's resin gemmaking tutorial over on youtube, which are quite helpful. She has several videos about casting your own gems, so check them out!
The tape I used must have not been the right kind of plastic, or I must not have added enough catalyst into my resin mixture, because the resulting gems were still tacky after several hours drying.
 I used 400 grit wet/dry sandpaper to sand the gems in the hopes the left over tackiness will disappear. I will probably still need to use a plastic polish to hide the sandpaper scuffs and make the gems shine.
The large gem in the middle is the only one that has been sanded so far, the other two feel like Jolly Ranchers. Ick!
I may also end up re-casting them if I can get a decent mold out of either alginate or plaster-of-paris.
Making your own mold out of paper and tape is incredibly tedious and difficult to do well if you have difficulty making patterns for geometric shapes.
==================================================================
I started working on the ears I'll need to go with my costume. I could have bought a pair of ears and saved myself some time and effort, but this is something I've always wanted to try. They'll fit better this way, too (in theory).
 I found the How to make Hobbit Ears tutorial and have followed their instructions up to the sculpt step.
I used alginate mold material and plaster-of-paris mix from my local Dick Blick. Both have worked well so far, although the dental-grade alginate has been damp to the touch, even after it has hardened, like it sweats. I have no idea why the alginate does this.
Regardless, I was able to get nice plaster casts from the molds I made.
I cut two lengths of wire, one for each ear, and rigged a wire support/armature to build the modeling clay around. I will likely add a wire into each finished prosthetic ear, to keep them from sagging.
There is still a bit of work to do on sculpting the ears to my satisfaction and making them as symmetrical as possible, but they are fairly evenly proportioned and decent enough for about 5 hours of work.
I swear, I'm not dead. I just broke my foot, so progress on the staff was stalled for about a week. I left off with adding layers of paper mache to the staff, and that's where I continued for another good one or two days (If you happen to be in a dry area, you will have greater success doing more layers of paper mache, but I'm in Illinois and summer gets decently humid so I only got about one each day).
Once the layers dry completely, it's time for the fun - sanding! I bought three different weights: 100, 150, and 200. I spent a lot of time sanding, and it does make quite a mess, so I was sure to put down a large sheet of paper to catch the dust. I did all of my sanding by hand, as most of the spots are not accessible with an electric sander.
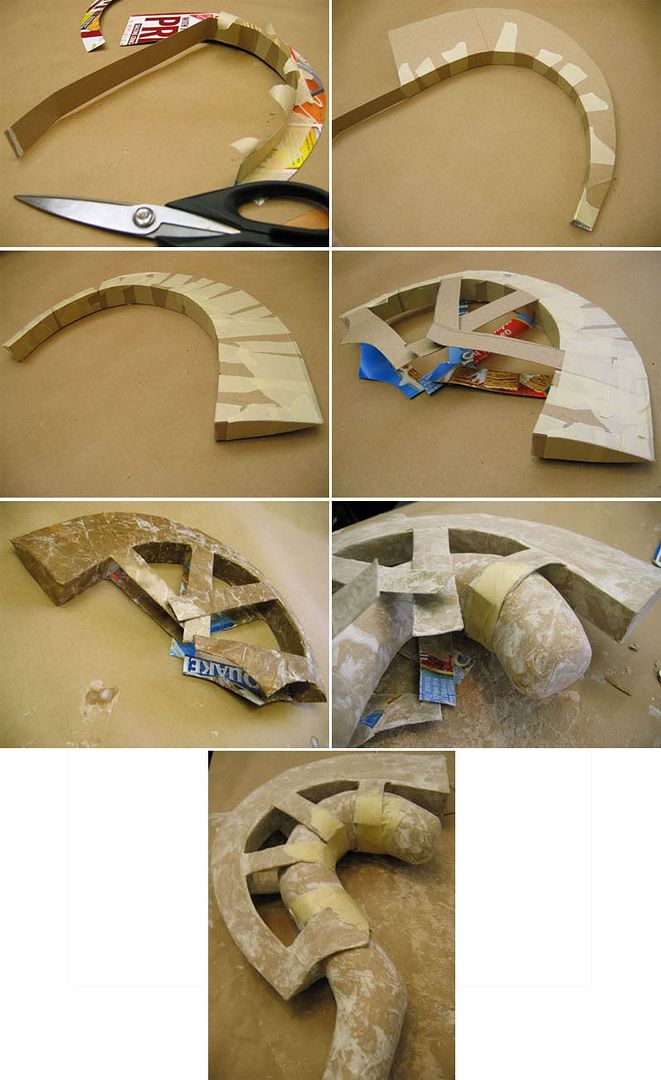
 If you remember the reference image, there is an attached crest portion at the head of the staff. I wanted it to be lightweight but sturdy, so I used leftover soda case cardboard and masking tape to construct the crest.I cut out the basic shape and taped a smaller strip of cardboard along the underside. To keep the rigidity of the shape I cut pieces fit to each end and attached them securely with masking tape. Tape is your best friend!
Once the shape was to my liking I added the tabs (that I later use to attach the crest to the staff head) and went through the paper mache process yet again. After everything was dry I trimmed down the tabs and taped the crest in place on the staff.
I bet you can't guess what comes next.. if you guessed paper mache you'd be correct! Oh yes. I am up to my eyeballs in paper strips and flour-paste. The cats love it - they chase the paper all around the house and try to eat the paste when I'm not looking, much to my frustration.
 More layers of paper mache are placed on the staff to cover the tape and keep everything stuck together. Once that task has been completed, the next step is more sanding. It is important to make a smooth surface for painting on later in the process, so I was sure to be thorough with my sanding.
Once the staff was free of paper mache lines and creases, and shaped to my liking, I went back and cut through the joints. For ease of use while building and attaching the crest, I didn't cover over the joints until after I had attached the pieces. Finding the right place to cut through was half guess and half luck; I'm going to say I was rather lucky on this front. I did miss the first time, but since I used a very thin blade, the spot in which I attempted to locate the metal screw is not very noticeable. I had very few rough edges from using such a thin blade, but I did one pass with a fine grain sandpaper to make sure I had not missed anything.
That is where I left off until this afternoon. Today I am in the process of priming the staff to be painted.
 Before I started, I sanded the staff once more time for good measure. One thing to be careful of, however, is over-sanding. If you sand too much, you risk pulling up a layer or layers of paper. I had a couple small spots with this, but they were easily trimmed off and sanded smooth.
After the surface looked smooth and free of rips, wrinkles, or tears I got out the gesso.
For anyone who is wondering what the heck gesso is; Gesso is a painting supply which can be found at most art stores. It is basically a primer. One does not necessarily NEED gesso, but it is definitely recommended. It gives a nice solid base on which to paint and it helps to keep some paints from bleeding through. I am not sure how well the paints I plan to use will work on paper mache as a base, so I opt to use gesso.
That is all the progress I have to share at this point, but I do hope to start painting soon. The staff will probably end up with two coats of gesso before it gets any paint.
 It's been another month since my last update, although I have been getting a lot done in the past week. The staff is finally finished! I may go back and add a leaf to hang with the straps, if I end up having time for that.
  Here you can see them with the first layer. I'll have to go back over once or twice more just so there's enough to sand without going through to the foam underneath.
  I used 400 grit wet/dry sandpaper to sand the gems in the hopes the left over tackiness will disappear. I will probably still need to use a plastic polish to hide the sandpaper scuffs and make the gems shine.
 I found the How to make Hobbit Ears tutorial and have followed their instructions up to the sculpt step.