I have been steamrolling right along on this staff, and I am glad to say that the major construction portion is complete! There has been much frustration over getting the faux wood grain to look realistic (because, yes, everything must be perfect and I am a masochist - my back can vouch for that one). Fortunately, I have had success with this endeavor, and have moved on to painting the green top portion of the staff. There was much rejoicing. I pre-mix my (acrylic) colors in recycled tubs - lids are your best friend if you plan to reuse a mixed color. I will be using the same paint on other pieces, so I mixed a lot of paint. I ended up using 4 different browns to get a wood grain I liked. There were two medium tone browns for the base and basic grain layout, one light honey brown for the highlights and a black-brown for added texture illusion.I used a mixture of wet and dry brush techniques. Fortunately, I spent my college career in the art and theater departments/classes so I have a lot of experience with painting. This helped immensely, although I know that anyone with enough patience and determination can achieve a nice faux wood grain.
The key here is following the brush's lead - don't try to force patterns that the brush isn't interested in executing. It is especially important for 3D projects! The surface isn't flat, it is usually much easier and looks much better if you just put on some good music and go with the flow.I started with the darker of the two base colors, waited for it to dry, added another layer (the gesso shows through if your paint isn't very opaque), and then started using the side of my brush to lay in the lines. I repeated with highlights, added some medium brown back in where the highlights stood out too much, then went in with the dark brown last to give it some depth. Another important thing to keep in mind when painting faux wood grain is that you should try to avoid going over highlights with your darker colors. Ideally you want to put darker colors next to the highlights in order to give the texture the illusion of depth. Once all the wood was painted on I went back over the mess with gesso where I needed to paint in the green, so I would not need as many layers of green paint to cover the wood grain. Currently the crest is painted green all around and tomorrow or the next day it should be getting the shading and pattern painted on.
I swear, I'm not dead. I just broke my foot, so progress on the staff was stalled for about a week. I left off with adding layers of paper mache to the staff, and that's where I continued for another good one or two days (If you happen to be in a dry area, you will have greater success doing more layers of paper mache, but I'm in Illinois and summer gets decently humid so I only got about one each day).
Once the layers dry completely, it's time for the fun - sanding! I bought three different weights: 100, 150, and 200. I spent a lot of time sanding, and it does make quite a mess, so I was sure to put down a large sheet of paper to catch the dust. I did all of my sanding by hand, as most of the spots are not accessible with an electric sander.
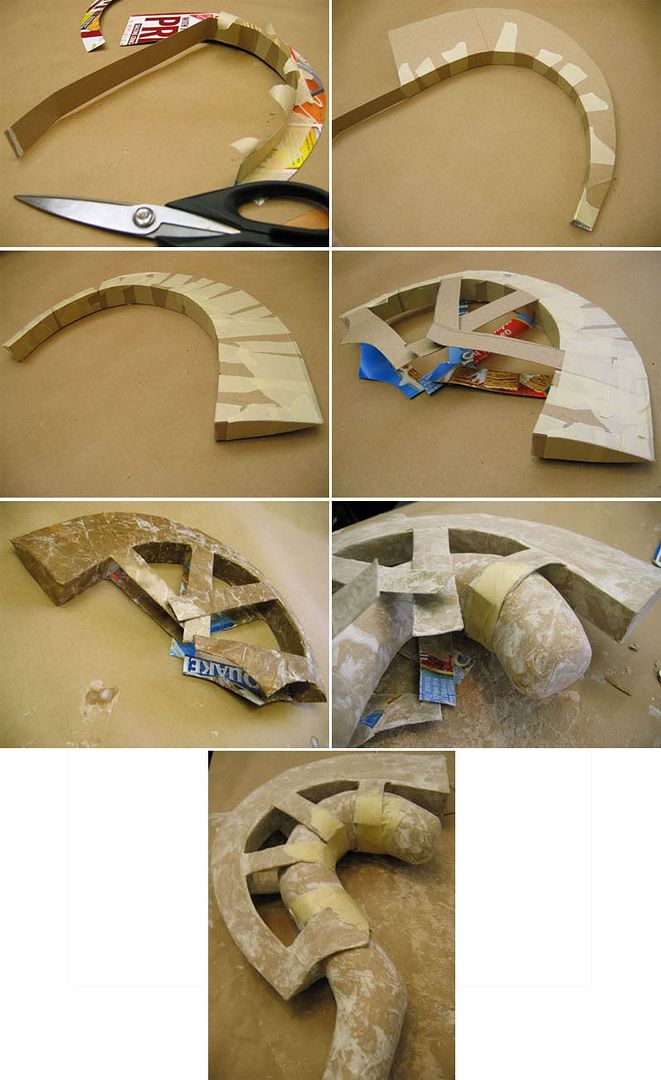 If you remember the reference image, there is an attached crest portion at the head of the staff. I wanted it to be lightweight but sturdy, so I used leftover soda case cardboard and masking tape to construct the crest.I cut out the basic shape and taped a smaller strip of cardboard along the underside. To keep the rigidity of the shape I cut pieces fit to each end and attached them securely with masking tape. Tape is your best friend!
Once the shape was to my liking I added the tabs (that I later use to attach the crest to the staff head) and went through the paper mache process yet again. After everything was dry I trimmed down the tabs and taped the crest in place on the staff.
I bet you can't guess what comes next.. if you guessed paper mache you'd be correct! Oh yes. I am up to my eyeballs in paper strips and flour-paste. The cats love it - they chase the paper all around the house and try to eat the paste when I'm not looking, much to my frustration.
 More layers of paper mache are placed on the staff to cover the tape and keep everything stuck together. Once that task has been completed, the next step is more sanding. It is important to make a smooth surface for painting on later in the process, so I was sure to be thorough with my sanding.
Once the staff was free of paper mache lines and creases, and shaped to my liking, I went back and cut through the joints. For ease of use while building and attaching the crest, I didn't cover over the joints until after I had attached the pieces. Finding the right place to cut through was half guess and half luck; I'm going to say I was rather lucky on this front. I did miss the first time, but since I used a very thin blade, the spot in which I attempted to locate the metal screw is not very noticeable. I had very few rough edges from using such a thin blade, but I did one pass with a fine grain sandpaper to make sure I had not missed anything.
That is where I left off until this afternoon. Today I am in the process of priming the staff to be painted.
 Before I started, I sanded the staff once more time for good measure. One thing to be careful of, however, is over-sanding. If you sand too much, you risk pulling up a layer or layers of paper. I had a couple small spots with this, but they were easily trimmed off and sanded smooth.
After the surface looked smooth and free of rips, wrinkles, or tears I got out the gesso.
For anyone who is wondering what the heck gesso is; Gesso is a painting supply which can be found at most art stores. It is basically a primer. One does not necessarily NEED gesso, but it is definitely recommended. It gives a nice solid base on which to paint and it helps to keep some paints from bleeding through. I am not sure how well the paints I plan to use will work on paper mache as a base, so I opt to use gesso.
That is all the progress I have to share at this point, but I do hope to start painting soon. The staff will probably end up with two coats of gesso before it gets any paint.
 I pre-mix my (acrylic) colors in recycled tubs - lids are your best friend if you plan to reuse a mixed color. I will be using the same paint on other pieces, so I mixed a lot of paint.
