I have been blazing right along with the construction on this project.Yesterday 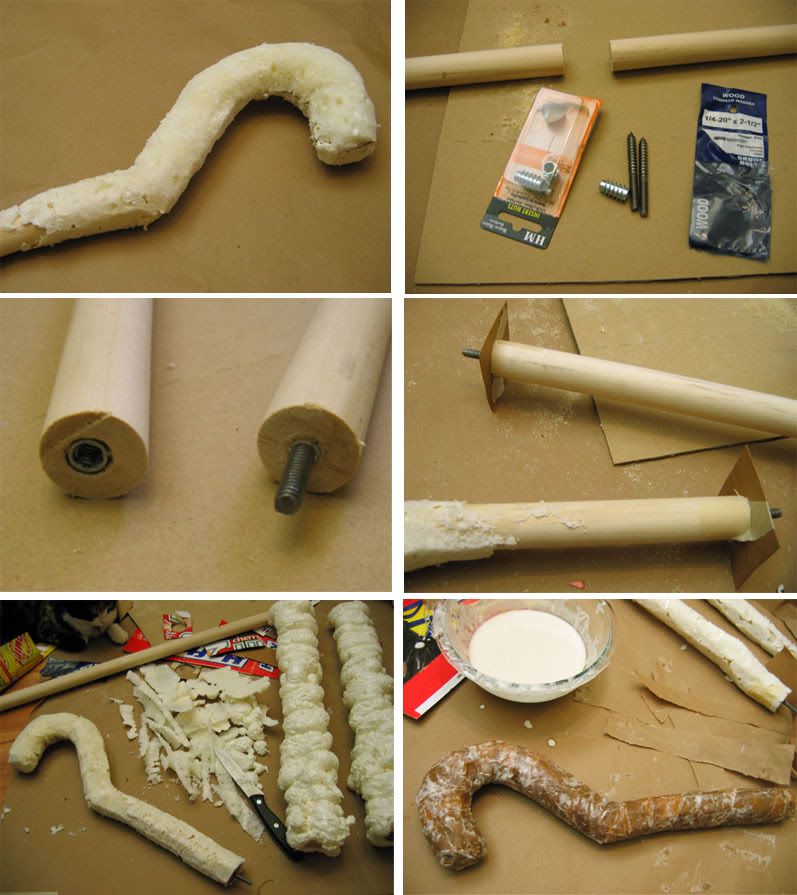 I left off with filling in air bubbles.
The next step is to decide the length of each segment. I am flying out to Blizzcon, so my props and costumes need to fit into my luggage. The standard for carry-on luggage is 45 linear inches, and I know my suitcase is 21 inches in length, so each section is approximately 20 inches without hardware.Once everything has been measured I cut and sand the edges, then drill pilot holes for my bolt hangers and insert nuts. These will be used to attach the sections into one whole, sturdy piece.After the hardware is installed, I glue cardboard platforms onto the ends to keep foam from covering my connectors. I cut these into the desired shape, they are useful as a guide while carving as well as a way to keep your hardware from getting covered with foam.
The next step is to paper-mache over the foam base. I used brown butcher paper torn into strips with 3/4 cup flour and about 1 cup water for the paste. Be sure to only do one layer at a time, and try not to have too much overlap. You must let each layer dry completely before moving on to the next, or your project will risk molding and becoming ruined.
I am still in the process of adding layers of paper-mache. It is a slow process, I recommend putting a movie on or listening to a sweet playlist while you work!
Here are some progress pictures of my Wildfury Greatstaff.
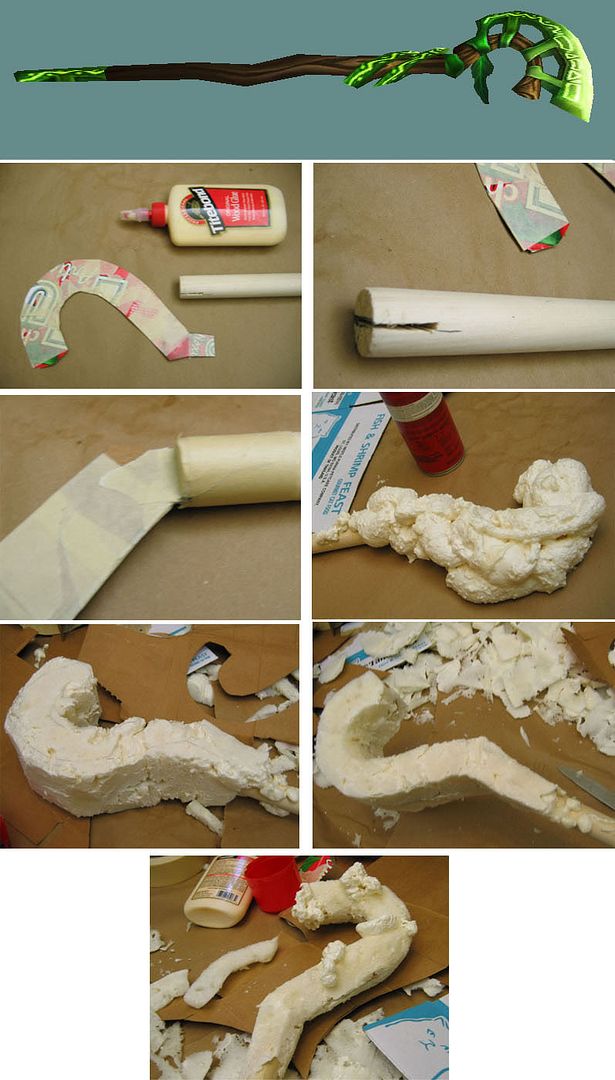 I started with a cardboard base for the curved shape of the staff head. One piece of thin cardboard was not enough, so I attached another with masking tape.
The staff needs to be sturdy, so I cut into the dowel rod with a dremel tool and a hand saw to get a notch deep enough to put the tab into. I secured it with wood glue and put more masking tape on to reinforce the base.
Next is the fun part - I used HILTI expanding insulation foam to cover each side of the template. Note: wait for the foam to dry and harden completely before you turn it over to spray the other side.
Once the foam is completely dry and hardened, you can begin carving the basic shape. I started off with flat surfaces and then carved into that to give the top a rounded look. I want it to look like the curved section is part of the dowel rod, so I was careful to keep them around the same size.
The foam ended up with a few air bubbles, so I went back and filled in the empty spots. Once that is dry I will carve back down to the correct shape and move on to the handle of the staff. As you can see in the reference image at the top, the handle is not straight, so I will be using the insulation foam to imitate the structure.
Welcome to my blog! I'd like to start off with an introduction. My name is Rachel, I am 26 years old and live in the United States. I have always had an interest in costuming, but this is my first foray into cosplay - and where better to start off than Blizzcon 2010!?
I will be keeping track of my work and progress here, and I hope that the information and photos will be helpful to others interested is using similar methods to construct costumes and props.
If you have any questions about any of my methods or materials, feel free to leave a comment.
And with that out of the way, off we go!